I stopped to take a closer look and could see that the
cabinets were solid wood and very sturdy.
Some still had the cabinet doors still on them. Other cabinet doors lay around with hinges
still attached. Surprisingly, the
cabinets didn't look damaged by being out in the rain. They just looked dirty. And I could imagine these cabinets all
cleaned up, painted white and residing in bedroom closets and my laundry room...
I knocked on the door and got no answer. So I left a note on the front door asking if
I could have the cabinets. A few days
later I got a response-- I could! The
cabinets were solid wood, so I knew they'd be heavy. My friend agreed to have her son in law go
with us-- he had a large truck which towed an open trailer which should hold
everything. We picked up 5 usable
cabinets, all the cabinet doors and lots of large pieces of wood and dragged it
to my garage. It took several days for
the wood to dry out and I got to work dreaming and designing.
I measured each bedroom closet and my laundry room. The master closets were updated; I had just
done them a few weeks ago. But the kids
rooms needed some work. Two of the
cabinets were 8 feet tall and skinny enough to put in the center of their
closets. I could put shelves and hanging
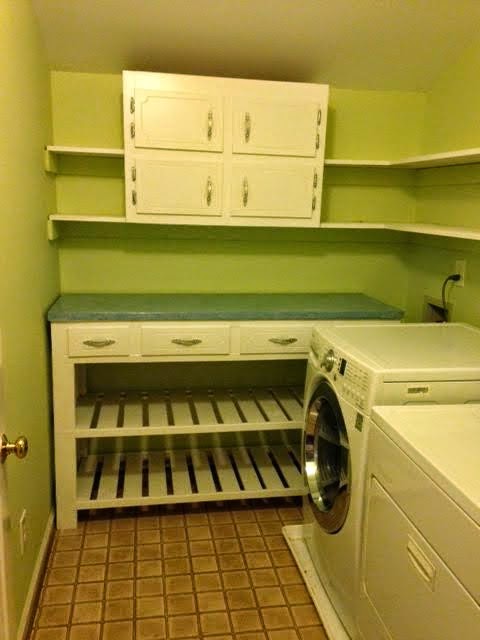
poles on each side to make really awesome closets! My laundry room could use two of the upper
cabinets. It was too small to hold any
more than that. The last one could go
into my basement for my wood shop.
Using graph paper, I mapped out the rooms and how I'd
install them. That gave me a good idea
of what supplies I'd need to buy. I'd
need lots of small pieces of wood, some hardware, and lots of paint. As I had been drawing out plans, I had come
up with a really crazy idea-- I wanted a table with shelves underneath for my
laundry room. None of the cabinets I got
would do; I would have to build this one.
I looked up plans on the internet and came up with some ideas of what I wanted and
another list of wood and supplies for it.
I cleaned off the cabinets, removed the doors, sanded them and applied a
coat of primer over the dark stained wood.
Then multiple coats of white paint.
One day it poured rain all day while I painted. It seemed like it took forever for the paint
to dry. I was getting antsy to get the
cabinets painted and installed!
We had some company over for dinner one night and as they
came, they saw the cabinets in the garage.
A woman in the group named Crystal offered to help me with them. She came and brought her son Gino, a recently
returned missionary, to help. Crystal and
Gino really sped up the process! We cut
the wood and built the table with shelves.
Then we painted it with several coats of white paint to match. For the countertop, we cut up an old door and
painted it up with blue and white paint, then covered it with a clear plastic
finish. We spray painted all the hardware
silver and set it aside, for when we reattached the cabinet doors.
I went out of town for the weekend, which allowed the
cabinets to really dry. Crystal and Gino
came over on Wednesday, Thursday and Friday of this week to help me install
them.
To install, we'd take the old metal wire shelves down and
fill the holes that they left in the walls.
Then we'd put support boards up where we wanted the shelves to go, leaving
a gap in the middle for the tall cabinets to reside. We'd fill the edges with caulk and let it all
dry. Then we'd paint the room, painting
the wood we installed too. We'd bring up
the cabinets, set them in place, attach them to the wall, then add the shelves
and closet poles to each side. A little
more caulk to fill any gaps and we'd hug and take pictures! The cabinets looked great in the closets!
We did the same thing in the laundry room-- removed the
shelves, patched the walls, installed wood and painted the walls. When we tried to put them in, though, one was
a bit snug. We had to climb up on the
washer and pound one cabinet in with a hammer to get it into place. We added shelves and caulked it up. Lastly, we brought up the table with
shelves. It was a tight squeeze getting
it inside and past the washer and dryer, but it fit beautifully and looks
great.
It took hours of my time, 5 days of hard work with Crystal
and Gino, and a few hundred dollars to renovate my laundry room and 3 bedroom closets. I'm happy that I could see potential in those
thrown-away mud covered cabinets. While
others didn't want them-- or just couldn't see any value in them-- I knew they
were worth saving. Although it took a
lot of hard work (my muscles are really sore) now I have awesome closets that
increase the utility of our closets and the value of my home. And I also have the satisfaction of having
rescued valuable cabinets and put them back to work. It was worth it!


